")
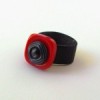
This summer my husband, son, and I went to Los Angeles for a vacation. While we were shopping, I found the most adorable key caps with tabby cat faces. Even though they do not say “Hollywood” on them or anything, those key covers turned out to be a great souvenier, because now whenever I use my keys (obviously often), those carefree California days come back to mind.
It was a set of two — one gray, one orange, so now it’s a cinch to distinguish my house key from my office key. But I really needed one more to completely free me from my key-finding fumbling.
I set out on a quest to locate some Friendly Plastic, a product I remembered seeing in craft stores years ago. It becomes soft and pliable when you heat it up, so it seemed like a plausible choice for a key cover.
But — alas! — apparently the local craft stores don’t carry it any more. So I mentally ran through some other possibilities.
- Duct tape?
- Melted grocery bags?
- Shrinky Dinks?
- Sculpy?
Even though I’m not very handy with Sculpy, I decided to give it a try. But then I made a discovery — there is now a Sculpy that stays pliable and bendy instead of hardening when you bake it. Also one called “Amazing Eraser Clay” to make pencil erasers! I don’t often shop the Sculpy aisle, so maybe these products have been out a long time, but I had never seen them before.
I probably should have purchased the “stays bendy” kind for this project, but the eraser one was cheaper … and I figured I could also make some cute erasers as stocking stuffers.
Here are some pictures of the project as it progressed:
")
")
")
")
Rolling the clay over a bottlecap helped create the necessary cavity in between the two surfaces.
")
")
")
")
I put a large key inside, before pinching the edges closed all around. This helped keep it from collapsing in on itself while I was working. It is important to cut the top hole wide enough to accommodate the entire width of the key, and to be very gentle when removing the key to avoid deforming the clay. Sliding a craft knift along inside both surfaces makes it easier to remove the key — otherwise it can stick to the clay.
")
")
")
")
I worried that the thickness of the cap would make it hard to get the key onto my keychain, so I cut all the clay away from the keychain hole on the back side.
During the decoration process, I got engrossed and stopped taking pictures. (Sorry!) I’d been wanting for years to try out the Millefiori technique, so it was fun to use that on the owl’s eyes. It came out better than expected for my first try!
")
When I was done with my owl, I had lots of the Millefiori left over and it seemed a shame to waste it. So I smooshed the slices together to make pencil erasers.