Colorful translucent pendant
You know those metal-rimmed string tags? Recently, I picked up a whole box of them, second-hand.

Those tags always remind me of Martha Stewart. She seems to like them a lot… I picture her writing on them very neatly (in ink of course), with all of the tiny words correctly spelled, beautifully legible, and perfectly centered.
But when I use them, I inevitably mess them up! Here is a little project that allows you to salvage the metal rims and turn them into a pendant or sun-catcher using crayon shavings, wax paper, and super glue.
Step 1: Create a wax design.
First, set up arrange some crayon shavings on the edge of a piece of wax paper. A mix of 2 or 3 coordinating colors is best. (Use a hand-held plastic pencil sharpener or a craft knife to shave the crayons.)

Then fold the wax paper over on itself, sandwiching the crayon shavings in the middle.
Sandwich the whole thing between 2 sheets of printer paper. Now, using an iron on a low heat setting and “dry” (no steam), gently iron over everything a few times.

You will notice as you iron that the page on top gets little oily-looking spots on it. That’s where the wax is melting onto it and creating wax paper! When you start seeing those spots, put the iron aside and peek under the top sheet.

The crayon shavings will have spread out and blended. If they have not melted completely, replace the top sheet and iron over them a few more times until they are thoroughly melted.

Then turn off the iron and let the wax paper cool.
Step 2: Prepare the tags.
Cut off the strings and then insert the tip of your scissors inside the hole of the tag. Gently cut the paper, being careful not to cut or deform the metal rim.


Cut out a hole in the middle of the paper, and also cut 2 or 3 lines that extend all the way to the metal rim.
Now the tricky part: Pull the paper inward toward the center of the tag, steadying the metal edge with your other hand, to remove the paper. Again you want to avoid deforming the metal part… and because you have to tug pretty hard to get the paper out, this is not always easy. (I found that some of my tags were easier to pull apart than others, and there was one that I just gave up on!)
")
Once one edge of the paper comes out, keep puling gently at it, trying to keep the paper all in one piece if you can. Once the paper is completely removed, lay the metal rim on a flat surface and make sure it is still flat (touching the hard surface all the way around.)

You can lay a book on it to straighten it out, if it is slightly bent.
You need to prepare two tags for each pendant.
Step 3: Cut the circular inserts.
I have a lot of round punches of varying sizes, and I found one that was the perfect size for my tags. You want circles that exactly fit in the frame of the metal tag. In other words, your circles should extend past the inner opening of the metal ring, but not quite all the way to the outer edge.
If you don’t have a punch that is exactly the right size, you can just draw around the metal rim and then cut the circle slightly smaller, or use a compass to draw a circle the right size. (Remember compasses from math classes? I go raid my son’s school supplies whenever I need a compass or protractor!)
If you are using a punch, turn it upside down so you can see what you are cutting, and put a sheet of white paper behind the wax paper. (This is a good use for one of your ironing sheets.) The white paper serves two purposes: It makes the design more visible so you can see what you want to cut, and it also helps you make a cleaner cut. Without the regular paper, I was unable to easily cut the wax paper – it was too flimsy and just got messed up when I tried.

If your design isn’t close enough to the edge of your wax paper, you may need to cut away some of the excess paper in order to get the punch centered over the wax design.
In addition to the wax design, you can also cut a couple of same-size circles from acetate, laminating film, or any thin, clear plastic. (I have also used the clear plastic from the flat lid of an empty egg container, or from a plastic “blister pack” that contained craft supplies. It is a great way to keep some of that stuff out of the landfill.) The clear plastic circles are optional, but do help make the pendant sturdier.
Step 4: Assemble the pendant.
Sandwich the wax paper between the two plastic circles, and sandwich that between the two metal rings.

Be sure that the backs of the metal rings face inward, so that they are hidden from view. You can tell which is the back, because that side has less metal, creating a small “ledge”.
My punch cut circles that fit perfectly on this ledge, which helped keep the circles centered and contained within the frame.
Now use a tiny bit of super glue, all the way around, to attach the edges of the two metal rings together. This can be a little tricky, also. You want to apply light pressure all the way around so that the two metal pieces are fully joined all the way around… but be very careful not to glue your fingers to the pendant!
Here are a few of my pendants at this stage of completion… they look really pretty with light shining through them!
Silver and gold shavings.

You’ll notice the shavings did not melt the same as the other colors. Maybe that is because of the little glittery flecks in those crayons; I’m not sure. Anyway, I like this one because it looks a little like granite.
Purple, teal, and fuscia shavings.

I don’t mind the little bubles — I think they only add to the design.
Olive green, brick red, and black shavings.

Step 5: Make a wire bail.
While the glue finishes drying, take some thick aluminum wire and some needle nose pliers and make a small coil.
")
Then bend the wire up and over…
")
and create another coil. You are creating a shape that looks kind of like narrow headphones… or Princess Leia’s hairdo from the first Star Wars movie!
")
Once the pendant is good and dry, put your homemade jewelry bail over one edge of the pendant and gently squeeze the coils together, so they hold the pendant tightly.
")
Put a drop of super glue between the metal circle and the wire coil, to keep it secure.
String a chain, ribbon, or shoelace through the bail and your masterpiece is ready to wear!

Of course you could add various embellishments to your pendant if you like – small crystals, metal charms, additional wire coils, etc.
You could make a whole bunch of these to create a pretty mobile or chandelier.
Or you could buy one of those sturdy bezels and sandwich your crayon masterpiece between glass, for a more substantial piece of jewelry.
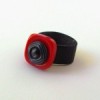
Here is one that I made last month for a “Hunger Games” swap.
")
The colors were supposed to suggest the “girl on fire” part of the story.
")
P.S. Since making my string-tags-and-crayon-wax pendant, I have discovered that there is a tool for making your own brand-new metal-rimmed tags. That would probably be considerably easier than my method!
")
Shine on!


The cool tool may be faster, but your way is WAY cheaper! The cool tool is 30 bucks, with only 18 tags, and refills are 10.95, whereas string tags are a couple of bucks for 50 of them…..easy choice for me! Thanks for sharing!