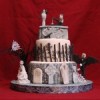
") A stack of yummy butter cookies, decorated with frosting and topped with hard candy, make a quaint setting for fondant bluebirds. It takes a while to make it, but the product is well worth the effort.
A stack of yummy butter cookies, decorated with frosting and topped with hard candy, make a quaint setting for fondant bluebirds. It takes a while to make it, but the product is well worth the effort.
You’ll need:
- Your favorite butter cookie or sugar cookie recipe (do not use slice-and-bake cookies, they are not sturdy enough)
- A few blue Jolly Rancher candies, put into a plastic bag and crushed into small pieces with a rolling pin
- Cookie cutters in varying sizes (can use almost any shape, such as round, flower-shaped, hexagonal)
- Aluminum foil
- Cookie icing (white)
- Buttercream icing (gray, yellow, green, and possibly pink; okay to use canned frosting if you like the taste of it)
- Fondant (yellow, blue, and possibly pink)
- Flower
- Icing bag, connector, and grass tip (#133)
- Toothpicks
- Food-safe paint brush
- Black food coloring
- Lace cutter or pastry wheel [optional]
- Floral garden cutter/ejector set [optional]
First, line your cookie sheet with aluminum foil. Don’t bake directly on the pan or the Jolly Rancher candy will stick to it.
You will need to bake eleven cookies in varying sizes. (It is best to have some extras, too, in case of breakage.) You should have at least four of the largest size — two for the top of the birdbath (one of which needs to have a round hole cut in the middle for the candy “water”) and two for its base. Then you’ll need two medium-sized cookies, two smaller, and three of the very smallest size.
During the last three minutes of baking, carefully add the crushed Jolly Ranchers to the round hole you cut in one of the largest cookies. Use a very small utensil (such as a 1/8 teaspoon measuring spoon) to fill the opening, being careful to prevent the candy from going anywhere else. Don’t use a plastic utensil or it may melt when it touches the hot pan.
Let the cookies cool on the pan, and then carefully peel the foil away from the cookies. The picture below shows the cookies I used for my project. (I used one more, not pictured, of the largest size to give more weight and stability to the base.)

Stack them in this order:
- Largest size, with melted candy
- Largest size, no hole
- Medium size
- Next-to-smallest
- Smallest (three in a row of this size… )
- Smallest
- Smallest
- Next-to-smallest
- Medium
- Largest
- Largest
")
Turn the stack upside-down and set the bottom two cookies aside. Heat the cookie icing per the instructions on the squeeze bottle, and use it to attach the cookies, being careful to avoid getting any icing on the candy (it would melt it.)
Then, keeping the stack upside-down for now, cover the entire surface with cookie icing, using the food-safe brush to sweep excess upward to prevent it from puddling. Leave the very top surface bare so that you will be able to flip the stack over on that surface later.
Once the icing dries to the touch, attach the two base cookies and turn the stack over. Apply more icing to the top of the birdbath, again avoiding the surface of the candy water. It is not necessary to ice the two base cookies (which is where you’ll pipe the grass), but you can if you want. This does not have to be super-smooth — you can make the surface smoother in the next step.
Once the cookie icing is fairly dry, tint some buttercream icing gray and smudge it over the surface of the cookie to give the appearance of concrete. This should be a thin and patchy layer, allowing the white to show through. If you put on too much, you can remove some with a paper towel. If you want to make it fancier, you could pipe some scrollwork on it.
To make the birds, roll small balls for their heads and larger ovals for their bodies. (Don’t attach the heads just yet.)
To make the wings and tails, roll out a layer of fondant and then cut it as shown, using the side of a toothpick to add detail. The whole thing should be about one-and-a-half times the length of the bird’s body; you’ll want the tail to hang down below the body when the the bird is sitting on the birdbath.
")
I used a lace cutter (see picture below) to make the scalloped edges, but you could make straight edges or use other tools such as a pastry wheel or finely-scalloped cookie cutter, to give a similar effect.
")
This set is “Lace set 3” from FMM. If you want it, you can get it at Global Sugar Arts, or at other cake decorating suppliers.
Now, apply a dab of water (just a tiny amount!) to the top part of the bird’s body and wrap the wings around it. Set the bird on the edge of an upturned cake pan (or the edge of whatever is handy and clean) to dry, positioning the wings however you like. (It looks best to have the two birds in different positions, one with wings closed and the other with wings open.)
Use another small dab of water to attach the bird’s head and put a tiny dot of water where you want to put the beak. Take a tiny ball of yellow fondant and gently squeeze it with you fingers to form the beak. Use a toothpick to stick the beak to the bird, then poke the toothick in the middle to make a deeper hole for the mouth. ")
The beak can be a bit fiddly; if you’d rather, you could use a couple of square sprinkles, stuck in halfway so that only one corner stuck out, or you could pipe on a beak, or you could use candy melts to make a beak shape to insert into the head.
")
Using the grass tip, pipe on the green grass all around the base of the birdbath. (If you don’t have a grass tip, you could use a star tip instead.) Either pipe on a few flowers, or use a floral garland ejector set to make them. Once the flowers are correctly placed, pipe small dots in the centers of the flowers.
When the birds are dry enough to handle, use dabs of icing to stick them on opposite sides of the bird bath. It may be helpful to put both dabs of icing first, and then apply the birds simultaneously, so that the whole assembly doesn’t get unbalanced. You can make fine adjustments after placing them, but be careful not to break their wings.
Take a fine brush and some black food coloring and paint on closed eyes. Be sure they are curved so that the birds look happy!
Splish, splash! Your birdbath is now complete! Store it under a cake dome (or upturned bowl) if you are not serving it right away.