Bottlecap necklaces
")
These are so cool I wish I could take credit for the idea, but they are all over the Internet. All you do is collect and clean some bottlecaps (or buy them at a craft store), glue little pictures inside, then turn them into jewelry!
Here’s what I used for mine:
- A one-inch round craft punch
- Necklace cording, ribbons, or chains
- Jewelry bails (little thingies glued to the backs of the bottlecaps; they have loops at the top for holding the necklace part)
- Super glue
- A crystal-clear-drying varnish (I used Diamond Glaze)
- Pictures (from magazines, cards, etc.) OR pretty papers
- Bottlecaps (a soda called Izze has really cute ones with asterisks on them… but be aware the design on the cap won’t really show–the bail will cover it up.)
- Optional: small embellishments like charms, beads, crystals, etc.
Step 1: Punch the pictures/inserts.
This part is so much fun, I got VERY carried away and ended up punching more than 100 pictures! Once I got started, I just could not stop. Now I suppose I have enough to give necklaces to every person I know… and several that I don’t.
")
Obviously, the picture is the “WOW factor” of the necklace, so choose carefully. When I gift or sell these, I plan to enclose little cards that tell a little bit about the images, to make the necklaces more interesting.
If you turn your craft punch upside down, you’ll be able to see exactly what you are cutting, so that you can punch with precision.
")
Step 2: Prepare the bottlecaps.
You’ll want to wash the bottlecaps if they came from real beverage bottles. Be sure they are completely dry before proceeding. You also need to remove the little plastic seal that is inside the cap. This is not so easy. I cut the edge with a craft knife, and then SLOWLY pulled it up, trying to keep it all in one piece.
")
")
")
")
Step 3: Glue pictures into the caps.
Take a small bit of the Diamond Glaze and brush a thin layer into the bottlecap. Then press the picture right into the middle of the cap. Make sure it is centered.
Let it dry for a couple of hours.
DO NOT be tempted to skip this step. When I did, some of my pictures floated up in the varnish and got off-center, ruining those necklaces.
Step 4: Varnish the pictures.
Now you are ready to do a thick layer of Diamond Glaze over your picture. DO NOT shake the bottle of Diamond Glaze. This will make lots of little bubbles and ruin your glass-like finish.
If you do get a bubble, take a corner of a piece of paper and touch the bubble to remove it. (This works better than trying to pop the bubble with a pin; trust me on this.)
Now be VERY, VERY patient. The glaze will look milky and translucent at first, but will dry to a perfectly clear, smooth finish.
")
Place the bottlecaps where they will not be disturbed for at least 24 hours. 48 hours is even better. If you touch the surface of the Diamond Glaze before it is fully hardened, you’ll get fingerprints that will ruin the glass-like finish.
Once the bottlecaps are fully dry, it’s time to glue on the bails.
Step 5: Glue on the bails.
Use super glue to attach the bails to the backs of the bottlecaps. (When using super glue, always be careful and follow package directions.)
")
If you lay the bail on a table, the loop should stick up toward you, as you see in the picture above. You can see the cute Izze asterisk on the bottlecap in this picture. But of course, you would have to flip the cap over to glue it, so that the asterisk side would get glued to the flat surface of the bail.
Center the bottlecap on the bail. If there is a “right-side-up-ness” to your image, make sure it is aligned correctly before you attach the bail. Super glue dries very quickly, so there is not much time for adjustments!
Step 6: String the necklaces.
Once the super glue is good and dry, string the bottlecap pendants onto your necklaces, and you are all done!
Here are some of my bottlecap necklaces:
")
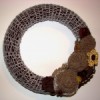
This is an X-ray picture of a seahorse’s tail, with a small crystal at the very center. The picture was from an old appointment book.
")
This a retro-style magazine illustration of a little girl. Notice this one is strung on a ribbon rather than a chain.
")
This one is my favorite, from a magazine story related to advertising and media. I liked it best stung on a black cord.
")
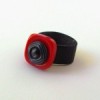
This last one features a metallic monogram. You may recognize it from my letter opener project; it is another of the metal monogram coins I purchased in the garden stone section of my local craft store. There is no glaze on this one. I liked the bare metal instead. This bottlecap is the only one that I purchased. I couldn’t find a genuine beverage cap that had the antique gold color I wanted, so I had to buy one.
Because the shiny silver bail looked out of place against the antique gold, I skipped the bail and used a nail to tap a couple of holes through the bottlecap and added jump rings to hold the chain. There were some sharp pointy bits on the back after I made the holes, so I used a file to smooth them out and make it safe to wear.
")
Well, I’ve got about 96 more necklaces to make, so I better get busy!


These are awesome – very creative. like you say, it’s the picture design that counts but you highlight some realll lovely examples.