Imprinting messages on homemade treats
")
Instead of enclosing a greeting card with your baked goods, how about embossing your message right on the sweets themselves?
I love this technique! It produces very professional-looking results, even for those of us whose handwriting is sketchy when using a frosting piping bag. You need to use fondant and to work fairly quickly, while the fondant is still soft.
For the mini-cakes above, I used a vintage Hallmark cookie cutter set:
")
These sets come with four pieces — two cutters and two embossers to add a message. (The messages differ slightly from one set to the next.) Used sets are available on eBay from time to time. As I type this, there is one set on eBay that is listed for eight dollars.
I especially like the “thank you” message because the arrangement of the letters is very bouncy and cute. I have used it several times for different projects. Below is a shot of the more of the mini-cakes. Some were baked in regular cake pans and then cut into squares to make petit fours; others were baked in mini-loaf pans.
")
The drawback to the vintage Hallmark set is that you are stuck with one or two messages. If you’d rather create a message of your own, you need to find something that will imprint individual letters.
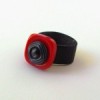
I found some nice letter embossers in the garden stone section of my local craft store.
")
Of course, these were not designed to be used with food, so you need to take special precautions to keep everything food-safe. Don’t worry, it’s easy — just slide a piece of plastic wrap between the fondant and the plastic letter. Don’t pull the plastic wrap tight; allow it to move when the letter is pressed into the fondant. This has the added benefit of keeping your cutters very clean.
(By the way… while it may seem like plastic items would be food-safe, they may not be. Chemicals used in the manufacturing process can leach into the plastic, and can then be transferred to the food each time you use the plastic item.)
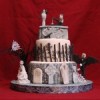
I used the garden stone letters to print quotes from Alice in Wonderland on this chess-piece-shaped cake:
")
The black fondant near the Mad Hatter says, “Off with her head!”
The blue fondant near the Cheshire Cat says, “All mimsy were the borogoves…” and
The green fondant near Alice says, “Curiouser and curiouser!”
One tricky aspect of using the garden stones letters, is keeping all the letters pointing in the right direction. When they are turned the right way around, they will look backwards to you. Another difficulty is keeping everything aligned properly. To help keep the words straight, you can use a toothpick to VERY lightly draw a line along the fondant, and then line up all the lettering on that line.
There are a couple of companies that have solved the problem of keeping the letters in a straight line, by manufacturing true letterpress-style cookie embossers. You load the individual letters into a linear tray, and then press the grouped letters into the fondant.
The Williams-Sonoma set costs about $20 US. Among its advantages:
- It includes three different cookie shapes (heart, star, and scalloped rectangle).
- It includes plenty of letters to make your message, including extra vowels.
- It includes some pre-made words (such as “welcome” and “birthday”) so that you don’t have to build those words one letter at a time.
- There is a mesh bag for storage of all the pieces.
Then there is a set from Germany:
")
Although it only includes one cookie cutter, a scalloped rectangle, it is actually a little more versatile in that it includes detatched letter trays. You can line up letters on those trays and then imprint them anywhere you want — on cookies that you have cut with your own cutters, or on cakes or cupcakes.
One disadvantage is that the letters are very small and so it can be challenging to load them into the trays. Also, small areas like the enclosed areas in the letters A and B, tend to collect residue until they no longer print properly. You need to inspect the letters before each impression, and clean them with a toothpick as necessary.
I used this set to personalize my basketball backboard cookies from a prior post.
For a fundraiser for my son’s school, I used both the garden stone set and the German set to create words of varying sizes, which gave the messages greater visual interest.


I have seen rubber stamps that were designed for use with food, which might be another embossing option. As someone who suffers from a latex allergy, I would urge everyone to use the plastic wrap between natural rubber stamps and fondant. Even if those stamps have been deemed food -safe, they are still a potential source of allergins.
Whatever embossing technique you choose, the recipients of your goodies are bound to be deeply impressed!