Design and make your own write-on wipe-off board
")
Message boards are so useful, and yet most of them are so…. well, let’s face it — UGLY. Wouldn’t it be great to have one that actually coordinated with your decor? One that made a statement (even when there was no message written on it?)
Well, here you have it! This is a DIY designer message board, and to make it even better, it is a very quick-and-easy project. It is magnetized (although you can switch it to have a ribbon hanger or sticky foam tape hangers), so it can easily be mounted on a refrigerator or the side of a filing cabinet.
First, gather your materials
Here is what you need:
")
- Foam core board
- Pretty paper
- Adhesive clear laminate (sort of like contact paper but shinier and smoother)
- Craft knife
- Scrap cardboard (to place underneath foam core when cutting)
- Hot glue gun and glue sticks
- Bandbox trim (or any other trim at east 1/2 inch wide that lends itself to wrapping around an edge, lengthwise)
- Felt or fleece
- Foam tape sqaures
- Magnets
- Pencil
- Scissors
- Dry erase marker(s)
Tips for choosing the pretty paper: It can be wrapping paper, wallpaper, scrapbook paper, etc. Make sure it is a reasonably light color (so that writing will show up) and has a smooth rather than a textured surface.
Design and cut the shape
Next, figure out what shape you want your write-on wipe-off board to be, and sketch it out on the foam core board. A simple shape with few twists and turns is best; the more complicated the design, the harder it will be to cut. Be sure your shape is no bigger than the dimensions of your pretty paper… and no bigger than the dimensions of the laminate.
")
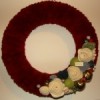
I wanted a round board, so I used a large platter as a template for my board.
Place the foam core board on the scrap cardboard and using the craft knife, cut out the shape you drew. Make the edges as smooth and neat as possible.
Use the shape as a template to cut the felt and the pretty paper in the same shape. Trace around it with a pencil and then cut. If the shape has a particular “right side” and “wrong side” (for example, if it is a word), flip it upside-down before tracing it onto the WRONG side of the paper and the RIGHT side of the felt.
")
Unroll some of the laminate, and cut off a piece that is larger than your shape. Ideally, there should be a couple of extra inches of laminate on all sides of the shape.
Cover with laminate
You are going to stick the paper shape to the plastic laminate sheet. First, place the laminate plastic-side-down on your work surface, and carefully peel off the paper backing. Try to avoid wrinkles and creases. To apply the pretty paper cut-out to the sticky side of the laminate, it sometimes helps to roll it up (Two edges rolling in toward the center.) Place the center flat against the sticky sheet, and then smooth out each side in turn, trying to avoid wrinkles and air bubbles.
")
Now, you should have the paper wrong-side up, centered on the sticky side of the laminate, with a few inches of sticky laminate sticking out at all sides. Put your upside-down foam core shape on top, aligned with the pretty paper.
Now, you are going to fold the edges of the laminate over the edges of the foam core board, To do this, place the whole assembly on the scrap cardboard and then use your craft knife to cut lines radiating outward from edges of the foam core shape. If there are some straight edges, you don’t need lots of slits on those parts of your design. But on all the curves, you will need to put quite a few slits — the smaller the curved shape, the more slits you will need. This will help the shape be smoothly covered.
")
Now, working from one spot all the way around the shape until you return to your starting place, fold the sections of excess laminate to the back of the foam core board. Smooth each section on the back before moving on to fold the next one. The laminate will overlap itself unevenly on the back; that’s okay because we will cover the back with felt, later.
Heat up your glue gun and flip the shape over to inspect the front side. If there are any air bubbles, you can carefully prick them with a needle or pin, and squeeze the air out to flatten the bubble. (Try not to make many pin-pricks; this may affect your ability to wipe the color fully off the board when using it.) If the shape is slightly off-center so that the foam core shows a bit, don’t worry. You will be covering the edges with the trim.
")
Trim the edges
When your glue gun is ready, use it to attach the trim to the edges of the board. I did mine wth two separate beads of glue. First, I did the edge and pressed the edge of the trim against it. Then, I carefully tucked a second bead of glue on the front of the board very close to the trim, then folded the trim over to hide the glue and pressed it into place.
")
Try to avoid getting threads of glue on the laminate. If that happens, let them dry and cool completely before trying to brush them off.
Attach magnets (or other hangers)
Flip the board over to the wrong side. Decide where to put magnets (or foam tape hangers).
I decided to use four magnets for my board. First, I stuck on four squares of foam tape. Then magnet squares on top of those.
")
You may want to use more magnets, or less. Be sure you use enough to hold the weight of the board. (Happily, the board is very lightweight!)
If you’d rather hang the board by a ribbon, attach the ribbon to the back of the board. Be sure to attach it securely with glue or duct tape.
Apply the backing
Place the felt on the back of the board. In pencil (or fabric marker if the felt is a light color), mark the position of your magnets. Cut out holes so that the magnets will not be covered by the felt backing.
")
Use glue to attach the backing. I used Elmer’s and only glued around the edges of the magnets and around the edge of the board.
")
All done! I mounted my board on the side of a black file cabinet in my office. I really like how it came out!
")
Of course, you can embellish your board in any way you like; I may add a felt flower to one edge of my board, if I feel ambitious later… Please post a comment if you make one. Let me know what shape you made and how you decorated it!